The procedure described above for printing an individual dialog or table is very useful for getting an immediate listing of the data you can see on the screen, and lets you control how much data you are going to print out. However, there will be times when you will want to generate a full listing of your model. STEM provides a number of options governing how much data will be listed.
- Select Print… from the File menu. The Print dialog is displayed.
- Select Model Data… from the list of what to print.
- Click OK or press <Enter>. The Print Model Data dialog is displayed.
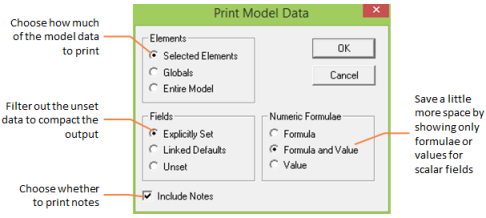
Figure 1: The Print Model Data dialog
- Choose from the various options and then click OK or press <Enter>. The model data is printed, according to the specified criteria, which are described below.
Options for printing model data
The Elements group lets you choose whether to print data for the entire model, or various subsets of it. By default the data which is printed is that for the currently selected elements.
The Fields group lets you filter out all the data which you haven’t explicitly set, removing pages of un-interesting default values from the output. If you want to include a specific unset field in the output, without selecting the Unset print option, you can always temporarily set that field with the Freeze command on the Edit menu in the relevant data dialog.
The Linked Defaults option is an intermediate option which includes data which is unset, but governed by a formula linking values from another element or a spreadsheet – see 4.14.3 Linking default values for model elements. Only fields which are explicitly set in the original element, or defined in the spreadsheet, will be added to the output.
The Numeric Formulae group lets you control what is printed for individual fields which are governed by a formula. By default, both formula and value are shown, but you can choose to exclude one or other from the output. For example, if Maintenance Cost is defined as User1 + User2 for a Resource, you can choose whether to show just this formula, the corresponding value, or both (the default).
The following two figures show the impact of the Fields options described above.
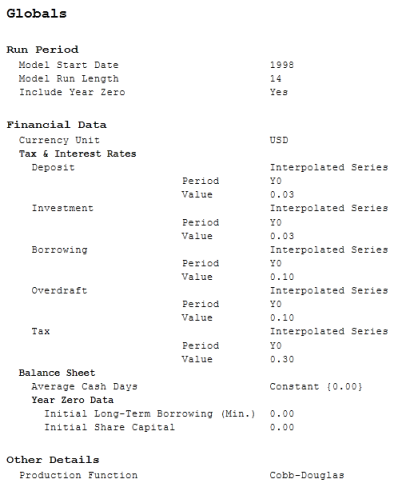
Figure 2: Sample globals print-out limited to explicitly set fields
Figure 3: Sample globals print-out including unset fields
Choosing a font for printing model data
When you print model data, the output does not use the same fonts as when you print the current data dialog. The simple reason for this is that the output is much more extensive, and a wider range of font sizes are required in order to distinguish the various groups of data. STEM uses a number of different styles in the output, derived from a user-selectable base font, allowing separate heading styles for elements and data dialogs, as well as different character styles for field labels, values and group headings within data dialogs.
If you want to change the base font:
- Select the Font button in the Print Setup dialog. A standard Windows font selection dialog is displayed.
- Select the desired font and size and click OK or press <Enter>.
Note: The font style – bold, italic, etc. – is ignored when printing model data, as various styles are imposed for different elements of the output.