The first few STEM models you create probably only have a few icons, but as you start to build more ambitious models, you will find that your model layouts expand beyond the edge of the screen. The effective size of a view grows to accommodate icons as you move them around and is not limited by the resolution of your monitor.
The view window itself represents the visible portion of the entire view. The logical extent encloses all the icons in that view, together with the portion visible in the view window itself.
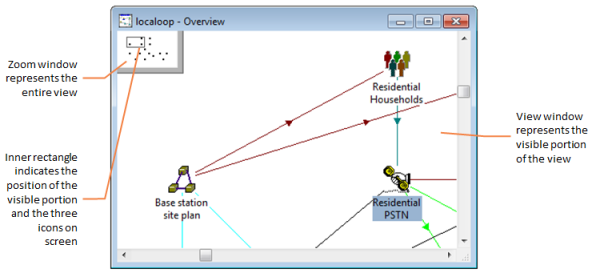
Figure 1: Logical extent of a view
There are several ways you can move around to see a different portion of the view:
- click the scrollbars on the view, or
- use the general purpose zoom function, or
- click and drag the rectangle in the Zoom window (as the rectangle moves, the view is re-drawn to preview the destination location, and then the view window scrolls to the new position when you release the mouse), or
- use the keyboard.
You will notice that you can never scroll right to the ‘edge’ of a view, because STEM always leaves a margin so you can move icons beyond the current extent.
Moving around with the Zoom window
The Zoom window occupies the top-left corner of a view window and represents a scaled-down image of the entire, logical view. Each icon in the view is shown as a small black dot. The image in the Zoom window contains an inner rectangle, which indicates the position of the visible portion.
You can use the Zoom window to move around a view:
-
Click on the inner rectangle inside the Zoom window and hold the mouse button down. The rectangle frame changes to a dotted line. (Alternatively, you can select Scroll Zoom from the View System menu).
- Drag the rectangle to enclose the desired portion of the view. The view window scrolls to the new position when you release the mouse.
If you wish, you can re-size the Zoom window:
- click and drag the Zoom window border, or
- press <Alt+minus> to access view System menu commands, or click on
 . For example, if you select Size Zoom from the System menu, you can use the mouse or the arrow keys to resize the Zoom window.
| Restore |
Use this command to restore this window to its original size after it has been enlarged, reduced, or shrunk to an icon |
| Move |
Use the keyboard to move the window to another position on the desktop |
| Size |
Use the keyboard arrow keys to change the size of the window |
| Minimise |
Use this command to shrink the current window to an icon |
| Maximise |
Use this command to enlarge this window so that it takes up the whole screen |
| Close |
Ends your activity in this window and closes the window |
| Next |
Use this command to take you to the next open view or next dialog. Whether it is a view or dialog depends on whether you select the command from a view or a dialog System menu |
| Previous |
Use this command to display the previously open view or dialog. Whether it is the next view or dialog depends on whether you select the command from a view or a dialog System menu |
| Scroll Zoom |
This command gives keyboard access for moving the rectangle within the zoom window and thereby navigating around the model using the arrow keys |
| Size Zoom |
This command gives keyboard access to resizing the zoom window using the arrow keys |
Figure 4: System menu commands
Moving around with the keyboard
You can also use the keyboard to move around a view. The arrow keys normally move the selection from one icon to the next, scrolling them into the visible window if necessary. However, the following key combinations scroll the view window directly:
| Ctrl + Arrow Keys |
Scroll in corresponding direction by the width/height of an icon |
| Page Up / Down |
Scroll up/down by the height of window less the height of an icon |
| Ctrl + Page Up / Down |
Scroll left/right by the width of window less the width of an icon
|
| Home / End |
Scroll to the left/right extremes of the logical view |
| Ctrl + Home / End |
Scroll to the top-left/bottom-right corners of the logical view |
Figure 5: Keyboard interface for moving around views
Selecting all elements in a view
If you want to select all the visible elements in a particular view, select Select All Visible from the Element menu, or press <Ctrl+A>. (Visible here means all the elements and links that you have not specifically hidden or removed from view. There may be some elements which are visible within the model but you cannot see them because they are beyond the boundaries of the view window. Elements which are hidden or removed from view are still displayed in the zoom window.) Elements can then be moved around as a block by holding down the Shift key and dragging with the mouse.
Locating particular elements in a view
If you want to list and display one or more particular elements in a view, you can use the List Elements dialog.
- Click on the
 button on the toolbar, select List from the Element menu, or press <Ctrl+E>. The List Elements dialog is displayed.
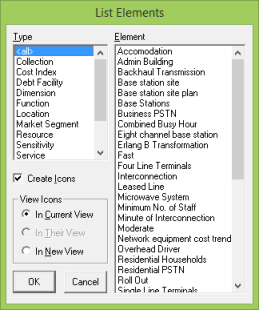
Figure 6: The Select Element(s) dialog
- Select the Type of element you want to find, or accept the default <all> to list all elements in the view.
- Select one or more elements, then click OK.
- If the elements are already present as icons in the view, they will become selected. The view will scroll if necessary so that the icons appear in the visible portion.
- Otherwise, new icons will be created for any missing elements. Initially they will be placed in the first clear space from the bottom-left corner across, and then up. You may prefer to move them to a more satisfactory position, by dragging with the mouse.
Alternatively, you may prefer to de-select the Create Icons option so as not to create new icons. Similarly, to create a new view containing only the selected elements, choose In New View from the Select Element(s) dialog.