Please revert to the WiMAX-DSL02 model.
 Save the model as WiMAX-DSL53
- Go to the User Data dialog for the Video service, and look at the various inputs presented.
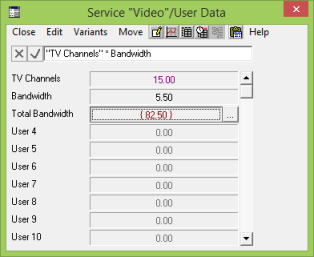
Bandwidth has been defined with a simple value which appears in black, whereas Total Bandwidth is entered as a formula, and the calculated value appears in red. TV Channels is a scenario parameter and appears in purple. The remaining attributes are unset and appear in grey.
You may also recall from the exercises about linking from Excel that fields linked via the defaults mechanism appear in blue if the original source data is defined, or in green if the original is unset or not defined.
You can alter these colours by selecting Colours… from the main Options menu. However, you do risk severely confusing your colleagues!
- Close the User Data dialog.
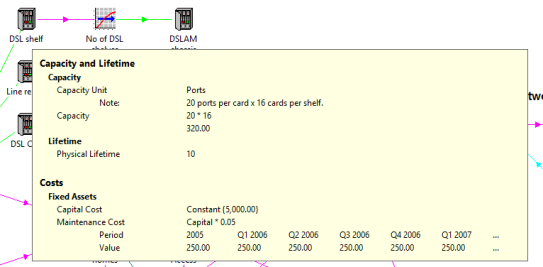
- Hold the mouse over the DSL shelf resource icon. A tooltip or floating window shows a summary of the data within the element. Only those attributes which have been explicitly defined are shown.
Copy and paste input fields
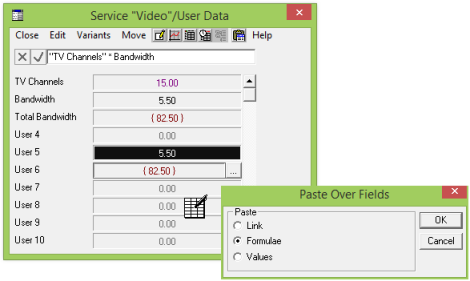
- Go back to the User Data dialog for the Video service and use the <Shift> key to mark a multiple selection from Bandwidth to Total bandwidth.
- Select Copy from the dialog Edit menu, or press <Ctrl+C>.
- Move down to User 5, and then select Paste Formulae from the dialog Edit menu, or press <Ctrl+V>. The data from the two fields copied is pasted into User 5 and User 6, including any formulae in the original data.
- You can use Paste Values to copy the data without the formulae …
- … or you can use Paste Link to create a link from each of the original fields to the new fields in turn, so that the new data will change whenever the original data is modified.

If you copy a formula which contains a reference to another field within the same element (such as the formula for Maintenance Cost in DSL shelf) from one element to another, then the corresponding reference in the copied formula will be relativised such that it points to the corresponding field within the target element. This is rather like a copied formula containing a relative cell reference in Excel. Try it!
This copy and paste mechanism is internal to the STEM Model Editor and works ‘by reference’. This means that the data pasted is copied as it is now, not as it was when it was copied.
STEM uses the equivalent of a paste formulae to copy variant data over respective dimension parameters when generating scenarios of a model.
Copy and paste fields via drag-and-drop
- Select the Bandwidth and Total bandwidth fields in the Video service User data again.
- Hold the <Ctrl> key down and drag from the selected fields to User 8. The Paste Over dialog appears with the same options to Paste Link, Formulae or Values.
Similar functions exist to copy whole elements or selections of elements.
- Close all the data dialogs.
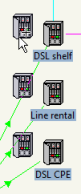
- Click and drag on the view background to ‘rubber-band’ select the three resources, DSL shelf, Line rental and DSL CPE.
- Select Copy from the main Edit menu, or press <Ctrl+C>.
- Alternatively, right-click the icons and select Edit/Copy from the icon menu.
- Select Paste Elements from the main Edit menu, or press <Ctrl+V>. Copies of the selected elements ‘float’ on the end of the mouse cursor.
- Click to drop the copies in the desired location. If you hover over the icons in turn, you will see that the new elements have exactly the same formulae and attributes defined as the originals.
Any references between the elements being copied will be relativised again so that a corresponding reference will exist between the newly created elements. This is how template replication creates self-consistent replicas in an expanded model.
- Select just the original DSL shelf and press <Ctrl+C>.
- Create a new resource from the toolbar.
- Select Paste Formulae from the main Edit menu, or right-click the new icon and select Edit/Paste Formulae from the icon menu. Again you will see that this gives the new resource exactly the same formulae and attributes as the original.
- You can use Paste Values to copy the data without the formulae, but note that this will set all of the possible attributes.
- Or you can use Paste Link to create a link from the original element to the new one, such that all of the attributes in the new element will change whenever any of the original data is modified. A brown formula link will join the relevant icons to indicate the flow of data.
Copy and paste elements via drag-and-drop
- Select the three resources DSL shelf, Line rental and DSL CPE again.
- Hold the <Ctrl> key down and drag from the selected elements to the view background. A copy of the selected elements floats to wherever you release the mouse, just as if you did a Paste Elements.
- Hold the <Ctrl> key down and drag from the original DSL shelf resource to one of the new copies. A Paste Over dialog appears with the same options to Paste Link, Formulae or Values.
- Try dragging a copy of an element into another view, or onto the application workspace if there is any space between your views.
What happens differently when you copy an element into another view in the same model?
 Things that you should have seen and understood
Copying and pasting over fields, paste by reference, pasting elements, pasting over
elements
Copy, Paste Formulae, Paste Values, Paste Link