So far, the installation of the DSL shelf is driven only by the number of ports required, which are assumed to be co-located at a single exchange or remote concentrator unit. Now we will consider the case where there might be several separate sites, each requiring DSLAM equipment.
 Save the model as WiMAX-DSL05
- Click the
 button on the toolbar, then click on the view desktop where you want the new element to be created. A new Location element is created as Location 1.
- Move the icon somewhere to the left of the DSL shelf resource.
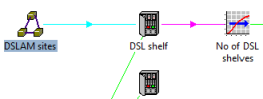
- Rename Location 1 as DSLAM sites.
- Select Details from the icon menu, change the Sites input to a constant 2.0, and then close the Details dialog.
- Use the connection tool to create a link from DSLAM sites to the DSL shelf. A pale blue arrow is drawn, denoting a deployment link.
When using the toolbar to create a new element, click once on the element you want, then click again within the view at the position where you want the new element to be created. A similar logic applies if you use the Element/Create menu.
 Save and run the model
- Look at the graphs for Capacities and Installed and Incremental Units for the DSL shelf resource. What is different? Can you explain the results?
- Switch back to the Editor and select Deployment from the icon menu for DSL shelf. The Deployment dialog is displayed.
- Select the Distribution field and click the drop-down button on the formula bar to review the available options. The One for One default just ensures that there is at least one unit per site.
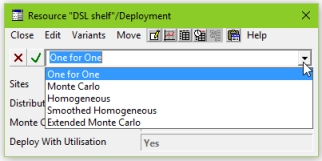
- Experiment with each of the other options and see how they affect the results. (Re-run the model keeping the same filename.)
-
Press <F1> on the Deployment dialog to find a detailed description of these options in the help system.
 Things that you should have seen and understood
Toolbar, Location, Rename, Sites
Deployment, Distribution, Monte Carlo Factor