Scenarios are defined in a STEM model through the introduction of dimension and variant elements. A dimension identifies up to 120 separate inputs in a model, and then each associated variant provides a corresponding set of time-series values for those inputs. The Variant Data for all the variants associated with the dimension are shown in a single table, with one row for each parameter, and one column for each variant, accessed from the dimension icon menu.
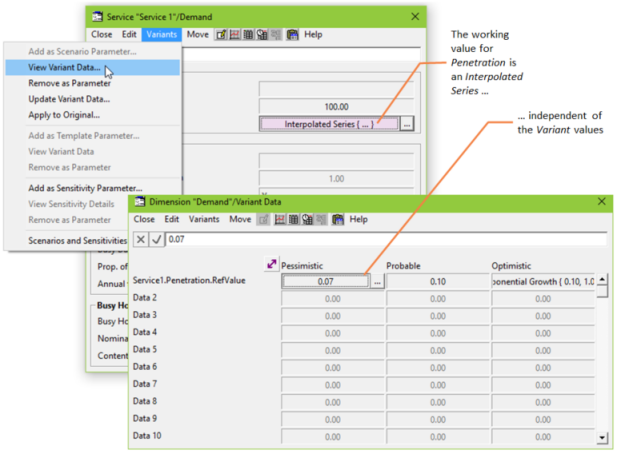
Figure 1: Working and Variant Data for service Penetration
When an input has been defined as a scenario parameter, the associated field is shaded pink, but the linkage between the input and the corresponding values in each variant is weak, in the sense that you can make subsequent changes to the working input independently of the variants. STEM does not impose a strong linkage, whereby the input would be constrained to take one of the variant values.
When you click the Working button in the Scenarios and Sensitivities dialog, it runs the model using the actual working values in the normal data dialogs. In effect, the working model exists as an independent scenario in its own right, which you can use to experiment with different values without necessarily updating your carefully defined variants. Of course, any value you change in the working model which is
not
a scenario parameter will affect the results of all scenarios of the model.
Updating Variant Data
If you have been experimenting with different values for a scenario parameter in the working model, i.e., in the working data dialog, and you decide you would like to use the new value for one of the variants, STEM provides a quick way to copy the working value into the variant:
- Select the input in the working data dialog, where the input field is shaded pink.
-
Select Update Variant Data… from the Variants menu in the data dialog. The Choose Variant Data to Update dialog appears, showing a list of variants in the dimension for this input.
-
Select the desired variant and click OK. The working value immediately replaces the corresponding variant value.
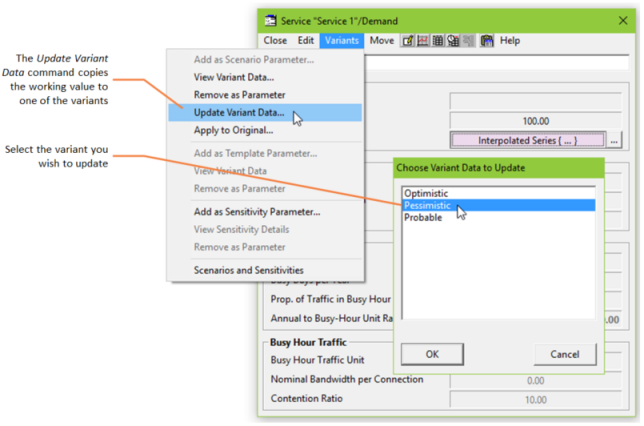
Figure 2: Updating Variant Data for service Penetration
Alternatively, if you prefer to review the variant data first, you can update a value from the Variant Data dialog:
- Select the input in the working data dialog, where the input field is shaded pink.
-
Select View Variant Data… from the Variants menu in the data dialog. The Variant Data dialog for the corresponding dimension is displayed, and the appropriate field in the first column is selected.
-
Select the variant value you want to update by left-clicking with the mouse or using the cursor keys.
-
Select Update Variant Data… from the Variants menu in the Variant Data dialog. Since the choice of variant is now implicit from the selected column, the working value from the original dialog immediately replaces the selected variant value.
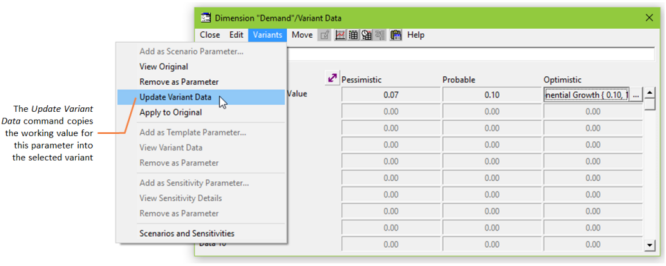
Figure 3: Updating Variant Data for service Penetration
If you opt to create a new variant, either from the toolbar, or by selecting Insert Element… from the Variant Data dialog, the new variant will automatically assume the current working values for
all
of its parameters.
Note: When you copy and paste data manually in the Editor, STEM prompts before replacing existing data, but this check is overridden when updating or applying scenario values.
Applying Variant Data
If you have been experimenting with different working values for a scenario input, and possibly updated a variant to match, or you simply want to work with another variant value, STEM also provides a quick way to copy a variant value over the working value:
- Select the input in the working data dialog, where the field is shaded pink.
-
Select Apply to Original… from the Variants menu in the data dialog. The Choose Variant Data to Apply dialog appears, showing a list of variants in the dimension for this input.
-
Select the desired variant and click OK. The working value is immediately replaced by the corresponding variant value.
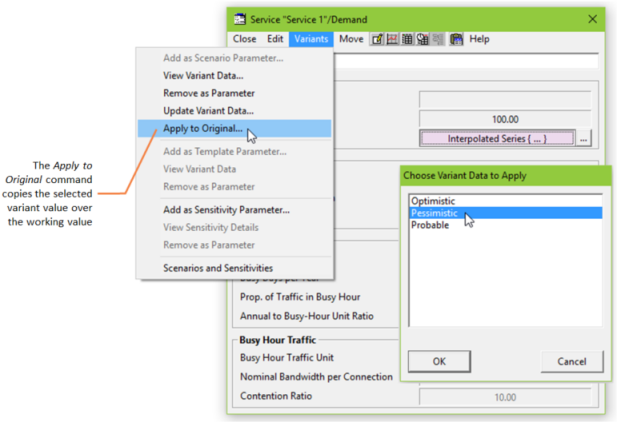
Figure 4: Applying Variant Data for service Penetration
Alternatively, you may prefer to look at the variant data first before making your selection, and so you can also apply a variant value from the Variant Data dialog:
- Select the input in the working data dialog, where the field is shaded pink.
-
Select View Variant Data… from the Variants menu in the data dialog. The Variant Data dialog for the corresponding dimension is displayed, and the appropriate field in the first column is selected.
-
Select the variant value you want to apply by left-clicking with the mouse or using the cursor keys.
-
Select Apply to Original… from the Variants menu in the Variant Data dialog. Since the choice of variant is now implicit from the selected column, the working value from the original dialog is immediately replaced by the selected variant value.
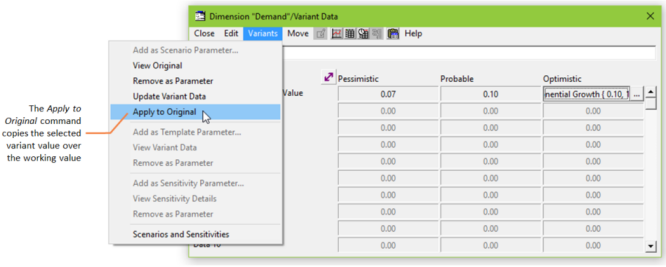
Figure 5: Applying Variant Data for service Penetration
Updating and applying scenario data
As well as being able to move individual scenario parameters in and out of the Variant data, STEM also provides the facility to copy all the parameters at once – see 9.3.7 Managing scenario data.
Adding a Variant
The Editor provides two ways to create additional variants:
- select Insert Element… from the Edit menu on the Variant Data dialog for a dimension, holding down the <Shift> key to add columns to the end of the row
-
 click the Variant button on the toolbar or press <Ctrl+Shift+V>, selecting the appropriate dimension from the Choose Dimension for New Variant dialog if necessary (i.e., if one cannot be inferred from the selection in the current view)
Whenever a variant is created, it automatically inherits the current working values for each of the parameters identified by the associated dimension.
Removing a Variant
If you decide that one of the Variants in a model has become redundant, the Editor provides a number of ways to delete it:
- select Remove Element from the Edit menu on the Variant Data dialog for a dimension to delete the variant associated with the current column
- select the variant icon and press <Del> or select Delete from the Edit menu on the main window
- select Delete… from the variant icon menu
- right-click on the scenario link leading from the variant icon to the associated dimension icon to show the link menu, and then select Delete….
The Editor prompts to confirm this action. On confirmation, all scenarios which apply this variant are removed from the scenario list and the corresponding scenario results on disk are deleted – see 9.3.5 Saving and running scenarios.
Note: If you delete the last variant in a dimension, any parameters will still be identified by the dimension; and if you then select View Variant Data… from the Variants menu in the working data dialog, the Editor will automatically create a new variant, inheriting the current working values.