Having learnt how to get data from Excel into STEM, now we are going to find out how to access STEM results from Excel. You will see that both parts of this process are ‘pull’ mechanisms: we have just created formulae in STEM which pull inputs from Excel into STEM; and now we are going to create formulae in Excel which pull results from STEM back into Excel. But first we are going to check some basic filename administration.
 Save the model as WiMAX-DSL21
-
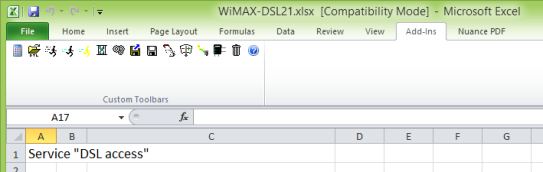
Please also save a copy of the WiMAX-DSL20.xlsx workbook from Excel as WiMAX-DSL21.xlsx.
- Go back to the External Links dialog in STEM (File menu/Links), where you will see that the external link still refers to WiMAX-DSL20.xlsx.
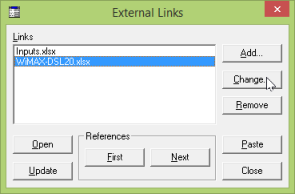
- Select WiMAX-DSL20.xlsx in the list of Links and then click Change. The Define External Link dialog is displayed again.
- Browse to WiMAX-DSL21.xlsx, or just edit the filename directly.
Saving a STEM model with a new name does not alter the external link within the STEM model, which will still refer to the original workbook.
If you save a copy of the workbook with a new name, then this is not reflected automatically in the name of the link within the STEM model, which you will need to fix by hand.
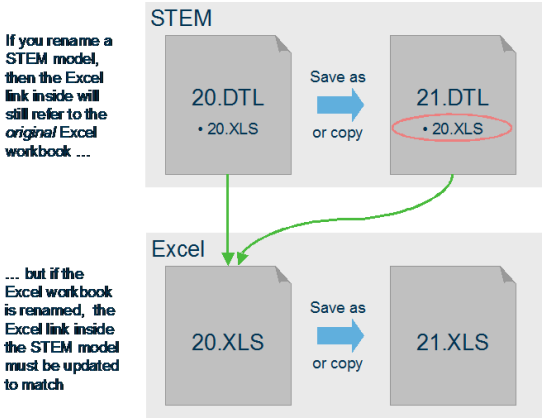

The Relative Path option for this external link which we selected earlier means that everything will still work if you copy the STEM model and Excel input sheet together to a different folder where both files still have the same names; but it is a common mistake to take copies of both STEM model and Excel input sheet within the same folder (where the names must be different) and then find that the model still refers to the old workbook!
 Save and run the model
Please save and run all scenarios, including the working model, before we proceed, otherwise there will be no results available to pull into Excel! (You should accept the prompt to update the external links from Excel.)
STEM add-in toolbar for Excel
An add-in for Excel is supplied with STEM which provides a toolbar to help create and manage a STEM results interface in Excel. The add-in is copied during the STEM installation into the appropriate place and is made available to Excel. It has to be activated manually in Excel and will then stay available. If you have not already done so, please install the add-in now.
- From the File menu in Excel, select Options, then select Add-Ins.
- Click Go next to the Manage: Excel Add-ins box at the bottom of the Excel Options dialog.
- You should be able to see STEM Add-In | Implied Logic in the list of Add-Ins Available.
- Tick the checkbox alongside it to load the add-in automatically when Excel starts.
- Click OK to close the Add-Ins dialog.
The add-in should be loaded immediately and a fresh copy of the STEM Add-In custom toolbar will be visible in the Add-Ins tab on the main Excel ribbon. The installation of the STEM add-in is now complete.

Note: the toolbar will only be visible when you select the Add-Ins menu (or ‘tab’ of the ‘ribbon’, as it is now known). In addition, depending on your company templates, it may be necessary to change the Excel macro security setting for a new workbook to allow access to its internal ‘VB project module’ to enable the STEM add-in to work properly.
You can access the relevant settings in Excel via the Options dialog box, accessed from the File menu. In the Trust Center category, click Trust Center Settings, and then click the Macro Settings category. You need to tick Trust access to the VBA project object model.
Excel is now enabled to get results from STEM models. There are several ways to prepare Excel workbooks to present STEM model results. With a little experience you can prepare a workbook yourself with support from the add-in. The first few times it will be more convenient to take advantage of the built-in export capability which can work from the charts already defined in the Results program.
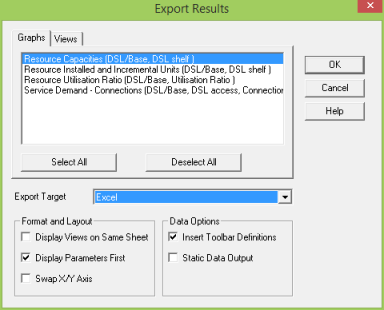
- Open the view DSL architecture in the Results program.
- Select Export Results from the File menu. The Export Results dialog is displayed.
The dialog lists the four graphs in the current view and it is also possible to export entire views. We are going to export the Resource Capacities graph.
- Select the Resource Capacities graph, ensure that the options to Display Parameters First and Insert Toolbar Definitions are checked, and press OK.
- STEM opens the existing WiMAX-DSL21.xlsx and inserts two new sheets. (If there were no workbook with the name of the current model in the model folder, STEM would create it.)
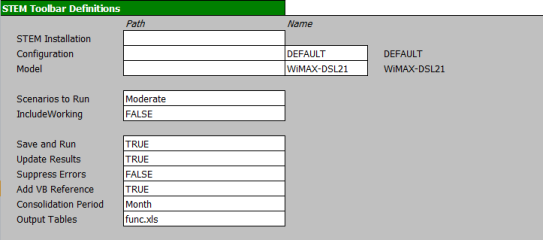
Let’s first have a look at the sheet called Toolbar Definitions. This sheet contains several configuration parameters that control the interface between the workbook and the add-in.
In most instances, the installation and configuration paths are located automatically and the relevant cells can be left blank.
As the model and workbook are both in the same folder, the path details in the STEMModelPath cell can be left empty and the add-in will locate the model automatically in the current folder. The model name is already pasted by the Results program during export. The linkage to STEM model results will still work without modification if the combined Excel plus STEM package is copied to another folder or computer.
Now let’s have a look at the results. Change to the sheet called Results 1. You should see the following content.
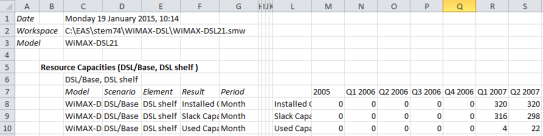
The header contains information about the export (date, workspace and model) and is just for information purposes. The following lines are the numeric results of the exported Resource Capacities graph for the DSL shelf.
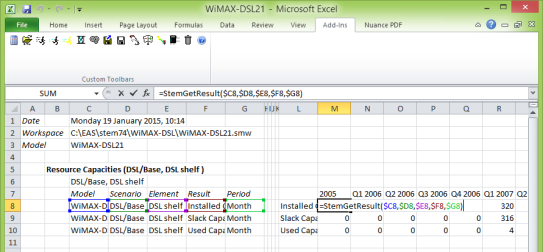
- Move the cursor down to the first block of results and look in the Excel formula bar. You will see a function, StemGetResult(), which is provided by the STEM add-in.
- Press <F2> to see the dependencies for this formula. You will see that it takes the model name, scenario and element names, and the result name from the cells on the left.
Customising the sample formulae
Try to add another result.
- Select the complete line containing the Used Capacity results (line 10). Copy and paste it into the next empty line.
- Change the result Used Capacity (cell F11) to Capital Expenditure.
- STEM automatically updates the results.
Press the  button (Paste Results) on the add-in toolbar to paste a list of selected results into your workbook. Select Resources from the Select Type of Result Names dialog that appears. Please say yes to the prompt “Paste result names into a new sheet?” in order to keep the current sheet clean.
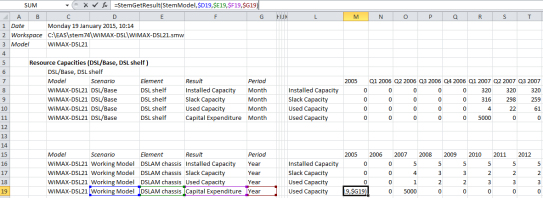
Now provide the same set of results for the DSLAM chassis with an annual consolidation for the working model.
- Select lines 7–11. Copy the lines and paste from line 15.
- Change the scenario in cells D16–D19 to Working Model.
- Change the element in cells E16–E19 to DSLAM chassis.
- Change the period in cells G16–G19 to Year.
The arguments of the StemGetResult() function can be references to cells, references to named ranges (e.g., the model name) or strings directly in the formula. Try to change the formula in the last row to take the model name from the ModelName in the Toolbar Definitions and type the result in to the formula.
The StemGetResult() function allows you to access a whole time-series of results across multiple columns in a worksheet, but this only works if the formula is entered as a so-called array in Excel.
You need to press <Ctrl+Shift+Enter> to define an array formula, or if you want to re-enter the formula after changing some of the cell references. Ask your trainer to demonstrate if any of this is unclear.
You can create Excel-based results files manually. If there is time, try it:
- Close the active workbook and open a new empty workbook.
- Click the
 button (Edit Toolbar Definitions), and accept the prompt, “Paste toolbar definitions into a new sheet?” A new sheet is inserted into the workbook which contains several configuration parameters.
- Click the
 button (Browse To STEM Model), browse to your latest model, WiMAX-DSL21.DTL, and click Open. The model name is updated in the Name cell in the Toolbar Definitions sheet, and the path to the training folder appears in the Model Path cell. If you prefer, you can edit the model name directly to the cell, too.
 Things that you should have seen and understood
Change external link, control sheet, model name and path, sample formulae, array formulae
STEM add-in toolbar for Excel, Edit Toolbar Definitions, Paste Results