If you want to refer to input data from another STEM model, the easiest way is to open the other model in the Editor, then click with the mouse to pick up the external reference, just as you would for an internal reference. See 4.13.4 Linking STEM model inputs to the results of another model for further information.
For other sources, including Excel files, you must type the <reference> text into a formula by hand, but you can use the External Links dialog to format the filename part correctly.
Pasting an external reference from the External Links dialog
Suppose, for example, you want to link the Capital Cost of a Resource to cell
$A$2
in the spreadsheet c:\data\costs.xls:
- Select Costs from the Resource icon menu. The Costs
dialog appears.
- Select the Capital Cost field with the mouse or cursor keys.
- Select Links… from the File menu on the main Editor window. The External Links dialog is displayed.
- Select the Add… button to display the Define External Link dialog.
- Enter c:\data\costs.xls
and click OK. The file is added to the list of Links in the External Links dialog.
Note: If you prefer to browse for the required file, you can click the Browse… button on the Define External Link dialog to display the Select External File dialog, a standard Windows file-selection dialog.
- Select the Paste button. The Select Name dialog is displayed, listing all the named ranges defined in the selected workbook.
- Select the required name from the list and click OK, or type any other reference, e.g.,
$A$2 and press <Enter> to complete the formula. The appropriate external reference is pasted into the current formula bar.
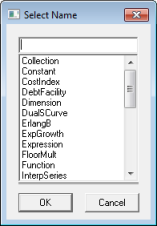
Selecting an external reference to an Excel workbook
Note: You can enter an unlisted name if you haven’t yet created the name to which you wish to refer in the workbook.
It is also possible to retrieve time-series data or default values for a whole model element from an appropriately formatted spreadsheet
– see 4.13.3 Finding and removing external links. The format required in the spreadsheet is described in the following pages.
Creating a spreadsheet of model input data
The following steps will export the currently defined input data for one or more STEM elements to a suitably formatted Excel spreadsheet and then replace the original data in STEM with a link to the values in the spreadsheet:
- Select the icon(s) in the STEM Editor for the desired element(s).
- Select Export Model Data… from the File menu. The Export Model Data dialog appears, as shown below, allowing you to control what will be exported.
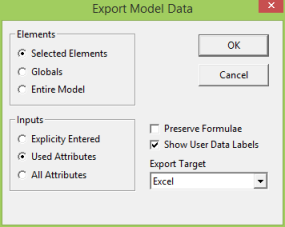
- The options in the Elements group determine whether data will be exported from the selected elements, the global inputs, or all inputs in the model. Choose the default option,
Selected Elements.
- The options in the Inputs group allow you to filter out data which you have not explicitly set. Select the default option
Used Attributes
to include inputs that you have explicitly set, as well as data fields which are governed by a formula linking values from another element or a spreadsheet. (The option
Explicitly Entered
will export only those inputs for which you have overridden the default values, while
All Attributes
will export prints all data fields, whether or not they have been explicitly set.)
- STEM opens or creates a workbook with the same name as the model, in the same directory. The selected data are written to a new sheet STEM 1, complete with labels which identify which fields have been exported. The Excel range containing the data for each element is named to match the element name.
- The workbook is saved and then displayed on screen, with the labels and data laid out according to the standard format used in
model.xls. In addition to columns for the labels and the data, as described in 11.1 External Reference Labels for Excel, the sheet created by STEM has two extra columns: a column that specifies the name of the element, and a column with headings corresponding to the names of the dialogs. Note that labels are only created for fields that are defined in the STEM model.
- STEM then asks if you wish to link the input data for the selected elements to the new spreadsheet.
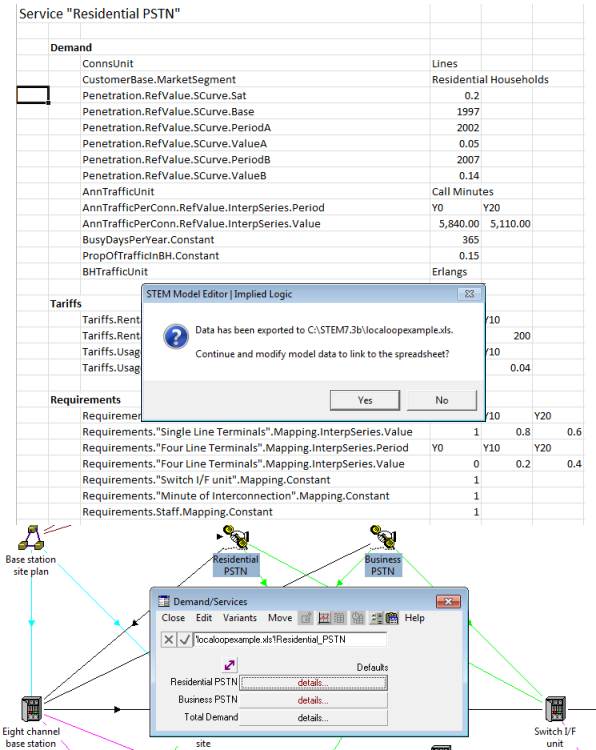
-
Click Yes. The explicit data in STEM is replaced with a single link to Excel for each element. Default values for the chosen elements are linked from the corresponding named ranges in the new worksheet, and the defined values in STEM appear in brown rather than black.
Note: When inputs are defined in terms of other inputs using formulae, the default is to export the resulting values. Alternatively, you can select the Preserve option in the Export Model Data dialog to preserve such formulae. In this case, the values are not exported to Excel.