The Arrange Elements dialog presents a variety of options for arranging a subset of the icons in a view, such as the resultant selection from a Show Precedents command. Icons can be arranged by category of link, or by type, and a there is also a choice of horizontal or vertical orientation. By default, the icons are arranged so that, as far as possible, the links between icons will run from left to right across the screen, making it easier to trace dependencies in the model.
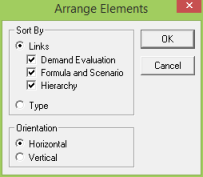
Figure 1: The Arrange Elements dialog
Sorting by Links
– In a large model it may not be possible to arrange the elements so that all categories of link go from left to right. It may be helpful to de-select one or two of the categories of link in order to focus on, for example, the demand evaluation structure or the structure of formulae in the model. In some cases this may also lead to a more compact arrangement.
Sorting by Hierarchy Links
– By default, following an arrange command Resource icons appear to the right of Function icons. If you repeat the arrangement, but de-select the Hierarchy category, you will see that these elements now line up, and that the chain of dependencies from left to right is more compact. The Hierarchy category is most useful for arranging a view that presents a number of Collections and their related elements.
Sorting by Type
– It is also possible to arrange icons in columns according to the type of element, by selecting Sort by/Type in the Arrange Elements dialog.
Changing the Orientation
– If you prefer, you can choose Vertical orientation in the Arrange Elements dialog so that dependencies are presented from top to bottom in a view. If you select Save Options from the Options menu on the main window, this setting will be restored in future sessions.
Arranging by influence
Suppose you had shown all the dependent elements for Residential PSTN, as above: 32 elements in total, including the original. Now you can impose some order:
-
Right-click the Residential PSTN icon and select Show/Arrange… from the icon menu. Alternatively, select Arrange Selection… from the Element menu on the main window. The Arrange Elements dialog is displayed.
-
Click OK to accept the default arrangement by all categories of link. All the selected icons are arranged relative to the current,
Residential PSTN icon, so that the successive causal links between elements appear as arrows from left to right.
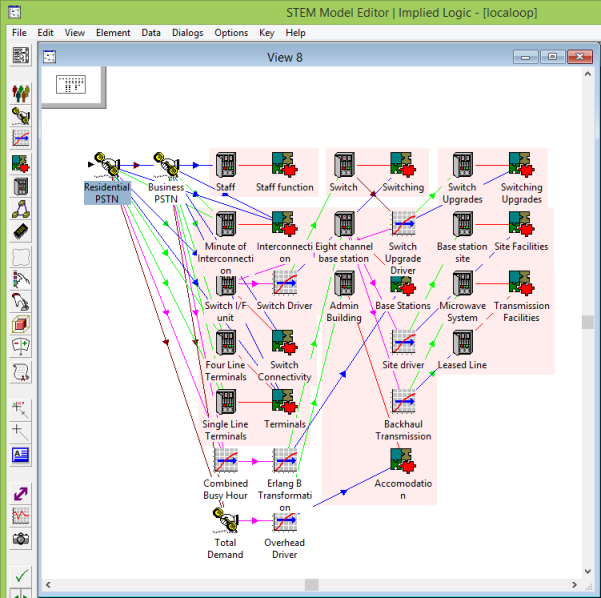
Figure 2: Dependent elements arranged by links
The pertinent structure is evident, and it is now far easier to see how one element relates to the others, even though there is still plenty of room for creativity in improving the presentation.
Arranging an entire model
Returning to the theme of an unfamiliar model, suppose you want to quickly gain an overview of the model structure:
- Select New from the View menu on the main window. A blank view is created.
-
Select Show and Arrange All from the Element menu. The Arrange Elements dialog is displayed.
-
Click OK to accept the default options again. The view is now filled with a comprehensive and structured layout representing every element in the model.
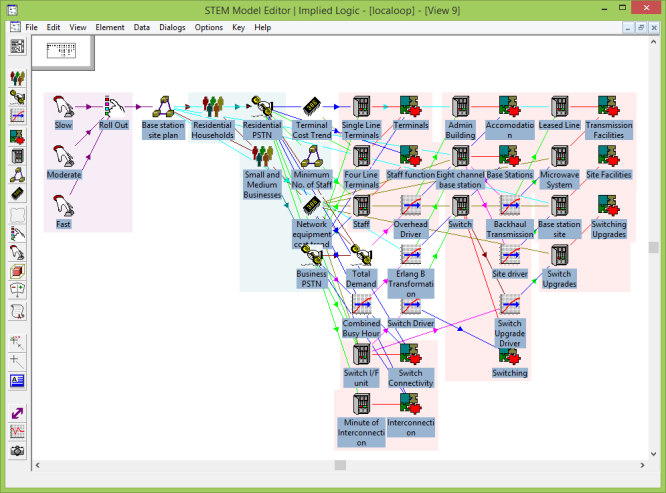
Figure 3: Entire model arranged by links
Formula and scenario links
If you examine this view in detail (preferably on your computer, rather than from this picture!), you will note that the
Residential PSTN
and Business PSTN
icons do not fall in the same column: this is because of the Formula link between them, reflecting data linked between the two Services. If you repeat the arrangement, but de-select the Formula and Scenario category in the Arrange Elements dialog, you will see that the Services line up, and in fact, that the arrangement is rather more compact, although some of the Formula and Scenario links no longer run from left to right as before.
Unlike demand-related links, which must have a unidirectional flow to avoid circularity in a model, it is quite possible to have Formula or Scenario links that counter this flow, since formulae are resolved and scenarios applied before a model is run. Moreover, since formulae and scenarios apply to individual fields within elements, it is also quite possible for these links to appear circular, if different fields are linked in opposite directions. Therefore, it is not always desirable or feasible to arrange icons so that
all
the links point the same way; and a clearer picture of the model structure may be gained by de-selecting one or two categories of link.
Hierarchy links
You will also note that the Eight channel base station
Resource icon appears to the right of the corresponding Base Stations
Function icon. If you again repeat the arrangement, but now de-select the Hierarchy category, you will see that the two elements also line up, and that the chain of dependencies from left to right is now at its most compact. The Hierarchy category is most useful for arranging a view that presents a number of Collections and their related elements.
Orientation
If you prefer, you can choose Vertical orientation in the Arrange Elements dialog so that dependencies are presented from top to bottom in a view. If you select Save Options from the Options menu on the main window, this setting will be restored in future sessions.
Type
The former arrangement style, in columns by type, is still available by selecting Sort by/Type, rather than Link, in the Arrange Elements dialog.
Note: For some types of element, e.g., Functions, Market Segments, there may be an additional item in the Show menu, e.g., Show/Resources or Show/Services, which can be used to display any hidden elements associated with this element that have been hidden using the Hide command.