 If you are already familiar with STEM, then the icon names and automatic links make a model almost self-documenting. But if you are not, then a few concise notes alongside the icons in the relevant areas of a view will make it much easier for someone to follow your ideas, and more immediately apparent than the existing notes on the embedded data.
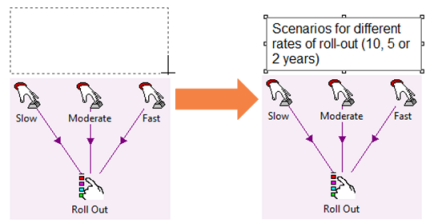
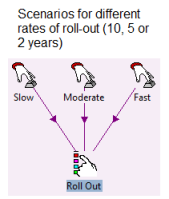
Text boxes can be added to a view; they can be used to add titles, group headings or explanatory notes, making it clearer how the key parts of a model work.
Creating a text box
Text boxes can be created using the new Text Box button  on the toolbar.
-
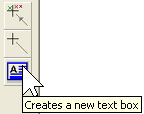
 Click on the Text Box button . The cursor changes as shown:
-
Click and drag the cursor to mark out a new text area, and type the required text.
- Click outside the box or press <Esc> to finish editing. The text box is displayed with a visible border while it is still selected. This border disappears if you move the selection to an icon.
By default, a text box does not have a border (unless it is empty). When you click in the text, a border with handles appears so that you can reposition or resize the box.
Alternatively, text boxes can be created by accessing the Element menu and selecting Create Text Box.
Note: Text boxes are displayed behind all icons and links so that a box can be used to visually group and label a block of elements.
Formatting text boxes
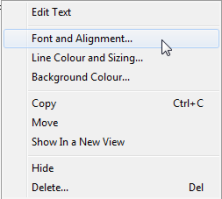 You can modify the font, alignment, border and background colour of text boxes. These formatting settings can all be changed by right-clicking on the border of a text box and selecting the appropriate command from the context menu (alternatively, press <Esc> to exit edit mode, then right-click anywhere in the text box).
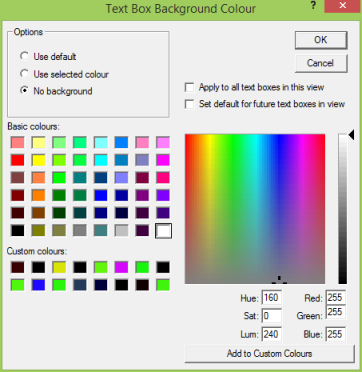
When you set the format (text, border or background) of a particular text box you can (a) apply that format to all other text boxes that currently exist in the view, and/or (b) set that format as the default for any newly created text boxes.

Text boxes autosize by default: the height of the box expands automatically to fit the text that has been entered. This setting can be turned off using the dialog for Line Colour and Sizing, as shown below.

It is also possible to define the background colour for a text box.
Note: You can set the font, size and colour for all the text in any one box, but you cannot apply formatting (e.g., bold) to individual words or characters.
Searching for text in text boxes
The Find function can be used to search for text in text boxes throughout the model – see 4.21.1 Finding elements, text and values.
Display logic for text boxes
Text boxes are displayed behind all icons and links so that icons and links remain selectable, and so that a text box can be used to visually group and label a block of elements. However, this means that you can’t stop links being drawn over text.