When the Editor creates a new icon for a model element, either when you first create the element, or when you are building a new view, the icons are initially located from the bottom-left corner across, and then up, the screen. You may prefer to move the icon to a more satisfactory position, by dragging it with the mouse:
- Click on the icon with the left mouse button, and keep the button pressed.
- Drag the icon to a new position.
- Release the mouse button to confirm the move. The view Zoom window, and all links to this icon, are redrawn to reflect the new position.
You can also move icons using the keyboard:
- Use the arrow keys to select the icon you want to move.
- Press <Enter> to show the icon menu, and select Move.
- Now use the arrow keys to move the icon to a new position.
- Press <Enter> to confirm the move, or <Esc> to resume the original position.
If you want to move a number of icons together, preserving their relative positions:
- Hold down the <Shift> key, or use rubber banding, to make a multiple selection.
- Move the icons as a group, with the mouse or keyboard, as above.
Arranging Icons
There are three commands which can be used to perform a logical arrangement of icons. These are all found on the Element menu on the main window of the Editor:
-
Show and Arrange All… arranges the icons for every element in the model.
-
Arrange Visible… arranges all the icons present in the current view.
-
Arrange Selection… arranges the selected icons in the current view. This command is equivalent to the Show/Arrange… command on the common icon menu for a selection of icons.
Note: Visible here means all the icons in the current view which you have not specifically hidden or removed from view. (There may be some icons which are technically visible, but you cannot see them because they are simply scrolled out of sight.)
All these arrangement commands display the Arrange Elements dialog, which presents a variety of options for how to arrange the icons – see 4.21.4 Arranging elements. By default, the icons are arranged so that, as far as possible, the links between icons will run from left to right across the screen, making it easier to trace dependencies in the model.
Using the Flip button to rearrange icons
The flow of logic in a model is usually easier to follow if dependencies between elements consistently run from left-to-right, or from top-to-bottom, at least within related blocks of elements. However, different considerations may apply for smaller groups compared to larger groups, or if several blocks must run orthogonal to another. Consequently there will be times, especially as a model evolves, when it will be desirable to re-arrange a block of elements to run from top-to-bottom instead of left-to-right, or vice versa.
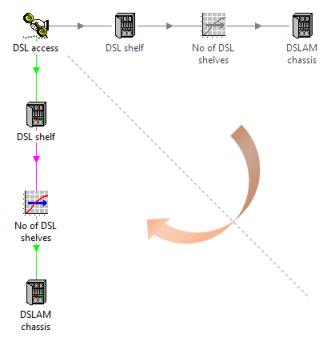
Figure 1: Re-arranging a block of elements to run from top-to-bottom
Effecting such a change by hand is not difficult if you use the element grid, but is tedious if there are more than a few icons in the block. There is a Flip button on the main toolbar to automate this straightforward task.
In order to flip a particular block of elements:
- Shift-click or rubber-band to select the elements in question
-
Click the
 button on the main toolbar or select Flip Selection from the Elements menu in the Editor. The selected elements are flipped, mirroring around an axis running at 45° from the top-left of the selection.
If more than one element is selected, then the selected elements are flipped relative to the top-left of the selection. The selection will be scrolled back into view if the flip action itself causes the selection to ‘flip out of sight’.
Alternatively, if just one element is selected, then the entire view is flipped relative to the selected icon, the position of which remains unchanged. Try it! (You can always flip again to get back to where you first started.)
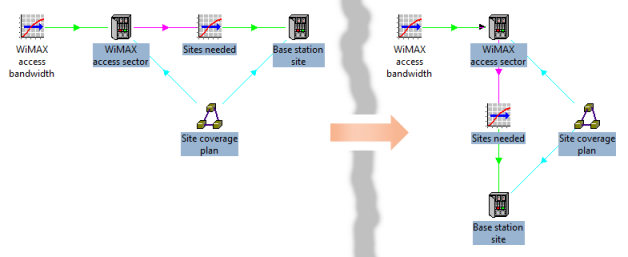
Figure 2: Flipping a particular block of elements
The flip action moves selected text boxes too, and this works well for a comment to the right of the selected elements which will become a comment below, and vice versa. The flip action does not alter the orientation of a text box, so a flipped text box may overlap any selected icons which were previously too close to the longer of its lower or right-hand edges.
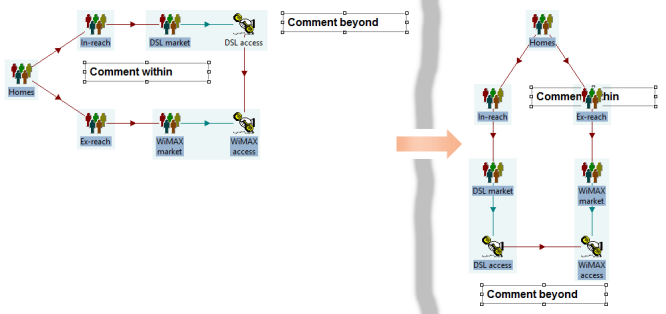
Figure 3: The flip action does not alter the orientation of a text box
Note: this Flip button on the main toolbar is similar in appearance and effect to the Flip button in a tabular dialog – see 4.5.3 Formatting data dialogs.
Snapping selected icons to the grid
If you want to arrange icons so that the links between them look neat and consistent, e.g., if you are going to use a particular view for presentational purposes, you can use the optional grid:
- Hold down the <Ctrl> key, or use rubber banding, to make a multiple selection.
- Select Snap Selection to Grid Now from the Element menu.
Each of the selected icons is moved to the nearest grid position. If two icons were previously very close together, they may both be moved towards the same grid position. In this case, one of the icons will be given a small offset from the grid to avoid it hiding the other, and to make it easier to select and move further away.
Note: if the Snap to Grid option has been selected on the Options menu, then elements will be aligned automatically to the grid.
If you want to tidy up an entire view:
- Select Snap Visible to Grid Now from the Element menu.
All visible icons in the current view are selected and moved to the nearest grid position, as above.
Note: Any hidden icons which are subsequently revealed by the Show All command, or from the Display Options dialog, may not line up with the other icons.
Moving icons on the grid
When you are moving an icon, either with the mouse or from the keyboard, you can temporarily constrain the movement of the icon to the grid by holding down the <Alt> key.
However, if you think you will mostly want to arrange icons on the grid:
- Select Snap to Grid from the Options menu.
Now when you move an icon, it will follow the grid automatically. With this option selected, you can still temporarily move an icon off the grid by holding down the <Alt> key.
The <Alt> key effectively toggles the option, however it is set.
Moving several icons on the grid
If you are moving several icons together, the Snap to Grid option works the same as described above, except that their relative positions are exactly preserved. The icon which you click on to start the move will follow the grid, but the other icons will only be on the grid if their initial spacing matched the grid. You can use the Snap to Grid Now command to tidy up the selection if desired.
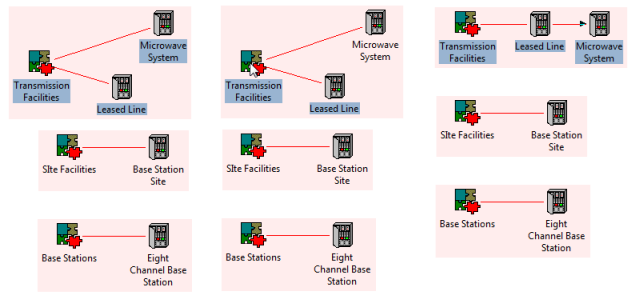
Figure 4: Moving several icons and then snapping to the grid
Changing the icon grid spacing
When you create elements, or use the Arrange commands on the Element menu, icons are spaced according to the horizontal and vertical spacing defined in the Display section of the Windows Control Panel. However, you will notice that the grid for moving icons is actually defined at half this spacing, in order to make it easy to position icons consistently at the halfway points. For example, if a Market Segment has a number of Services, it may be desirable to arrange the Service icons in a line, with the Market Segment icon either alongside the middle one or halfway between the middle two, depending on whether there is an odd or even number of Services.
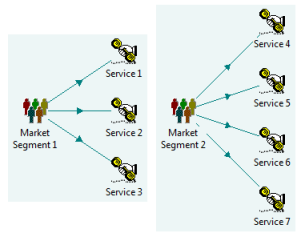
Figure 5: Icons on the grid and halfway points